
Frequently Asked Questions (FAQ)
- Installation & Setup
- Basic Usage
- Why should I pay for this when free arranger scripts exist?
- How does the plugin decide which object is the container?
- How does Arrange Master handle raster images (photos)?
- Does it support true-shape nesting or just bounding boxes?
- Can I use a group of objects as the container?
- Does the plugin work with objects on different layers?
- Can the plugin rotate items to better fit inside a custom shape?
- Troubleshooting Layouts
- I clicked "Arrange" but nothing happens, or I get an error. Why?
- Why are my items arranged in a rectangle even though my container is a circle?
- Why do my items only fill a small part of the container?
- Some of my items are placed outside the container. Why?
- I get the error "Target layer cannot be modified." How do I fix it?
- In Shape Respect, my items aren't arranging inside the shape at all. What's wrong?
- Why does Shape Respect (Accurate Mode) take so long to run?
- Why do I get a "Please select at least 2 objects" error with raster images?
- I clicked "Cancel", but my original objects are gone! How do I get them back?
- Why can't Arrange Master create a beautiful composition with just a few objects?
1. Installation & Setup
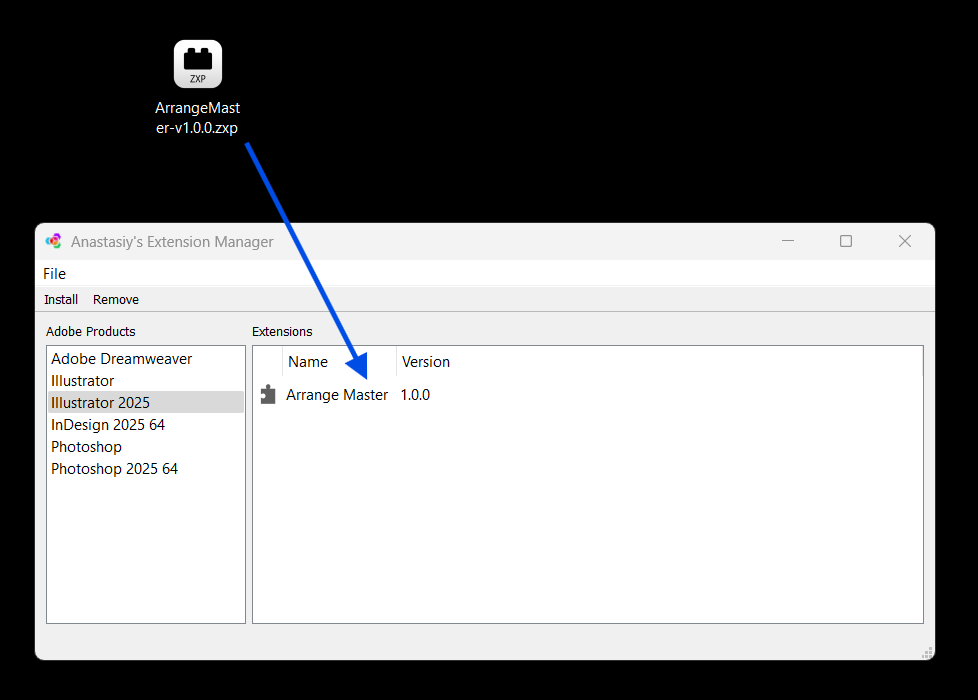
Q: How do I install the Arrange Master `.zxp` file?
A: The .zxp file is an extension package that needs a dedicated installer. You cannot open it directly. We highly recommend using Anastasiy's Extension Manager, a free and reliable industry-standard tool.
- Download and install Anastasiy’s Extension Manager from: install.anastasiy.com
- Launch the Extension Manager.
- Simply drag and drop your
ArrangeMaster.zxpfile onto the Extension Manager window to install.
Alternative Installers:
If for any reason Anastasiy's Extension Manager doesn't work or fails to detect your Adobe applications, you can use one of these excellent alternatives:
- ZXPInstaller: A simple and effective alternative. Download from zxpinstaller.com
- aescripts + aeplugins Manager App: A powerful manager app that is very good at detecting Adobe applications. Download from aescripts.com/aescripts-aeplugins-manager-app/ and use the
File > Install ZXPmenu option.
Q: Where do I find the panel after installation?
A: Once installed, you must restart Adobe Illustrator. After restarting, you can find the panel in the main menu under:Window > Extensions > Arrange Master
Q: The panel is blank or shows an error. What should I do?
A: This is usually caused by a sync issue with the Creative Cloud app or a security restriction that prevents the extension interface from loading (often called the "PlayerDebugMode" issue). Please try these solutions:
Solution 1: Restart Creative Cloud (Mac & Windows)
- Completely quit Adobe Illustrator and the Creative Cloud Desktop app.
- Relaunch the Creative Cloud Desktop app and ensure you are logged in.
- Relaunch Adobe Illustrator.
Solution 2: Fix for macOS (Terminal)
If you are on a Mac, you need to enable the debug mode manually using the Terminal. This ensures compatibility with current and future versions of Illustrator.
- Quit Adobe Illustrator.
- Open the Terminal app (Command+Space, type "Terminal").
- Copy and paste the following code block into the Terminal and press Enter:
defaults write com.adobe.CSXS.11 PlayerDebugMode 1
defaults write com.adobe.CSXS.12 PlayerDebugMode 1
defaults write com.adobe.CSXS.13 PlayerDebugMode 1
defaults write com.adobe.CSXS.14 PlayerDebugMode 1
defaults write com.adobe.CSXS.15 PlayerDebugMode 1
defaults write com.adobe.CSXS.16 PlayerDebugMode 1
defaults write com.adobe.CSXS.17 PlayerDebugMode 1
defaults write com.adobe.CSXS.18 PlayerDebugMode 1
defaults write com.adobe.CSXS.19 PlayerDebugMode 1
defaults write com.adobe.CSXS.20 PlayerDebugMode 1
killall -u `whoami` cfprefsd
- Restart Adobe Illustrator.
Solution 3: Fix for Windows (Registry)
If you are on Windows, you need to create a registry key to unlock the panel. Follow these steps to create the fix file yourself:
- Open Notepad.
- Copy the code below and paste it into the empty text file:
[HKEY_CURRENT_USER\Software\Adobe\CSXS.10]
"PlayerDebugMode"="1"
[HKEY_CURRENT_USER\Software\Adobe\CSXS.11]
"PlayerDebugMode"="1"
[HKEY_CURRENT_USER\Software\Adobe\CSXS.12]
"PlayerDebugMode"="1"
[HKEY_CURRENT_USER\Software\Adobe\CSXS.13]
"PlayerDebugMode"="1"
[HKEY_CURRENT_USER\Software\Adobe\CSXS.14]
"PlayerDebugMode"="1"
[HKEY_CURRENT_USER\Software\Adobe\CSXS.15]
"PlayerDebugMode"="1"
[HKEY_CURRENT_USER\Software\Adobe\CSXS.16]
"PlayerDebugMode"="1"
[HKEY_CURRENT_USER\Software\Adobe\CSXS.17]
"PlayerDebugMode"="1"
[HKEY_CURRENT_USER\Software\Adobe\CSXS.18]
"PlayerDebugMode"="1"
[HKEY_CURRENT_USER\Software\Adobe\CSXS.19]
"PlayerDebugMode"="1"
[HKEY_CURRENT_USER\Software\Adobe\CSXS.20]
"PlayerDebugMode"="1"
- Click File > Save As.
- Name the file fix.reg (make sure to select "All Files" in the "Save as type" dropdown so it doesn't save as .txt).
- Double-click the created fix.reg file and click Yes to confirm adding the data to your Registry.
- Restart Adobe Illustrator.
2. Basic Usage
Q: Why should I pay for this when free arranger scripts exist?
A: While free scripts can handle simple grid tasks, Arrange Master is a professional creative tool built for advanced results, stability, and speed. You are investing in:
- Save Time, Save Money: Arrange Master does in seconds what takes hours to do by hand. The price is set at roughly the cost of one hour of a professional designer's time. This means it pays for itself the very first time you use it on a project.
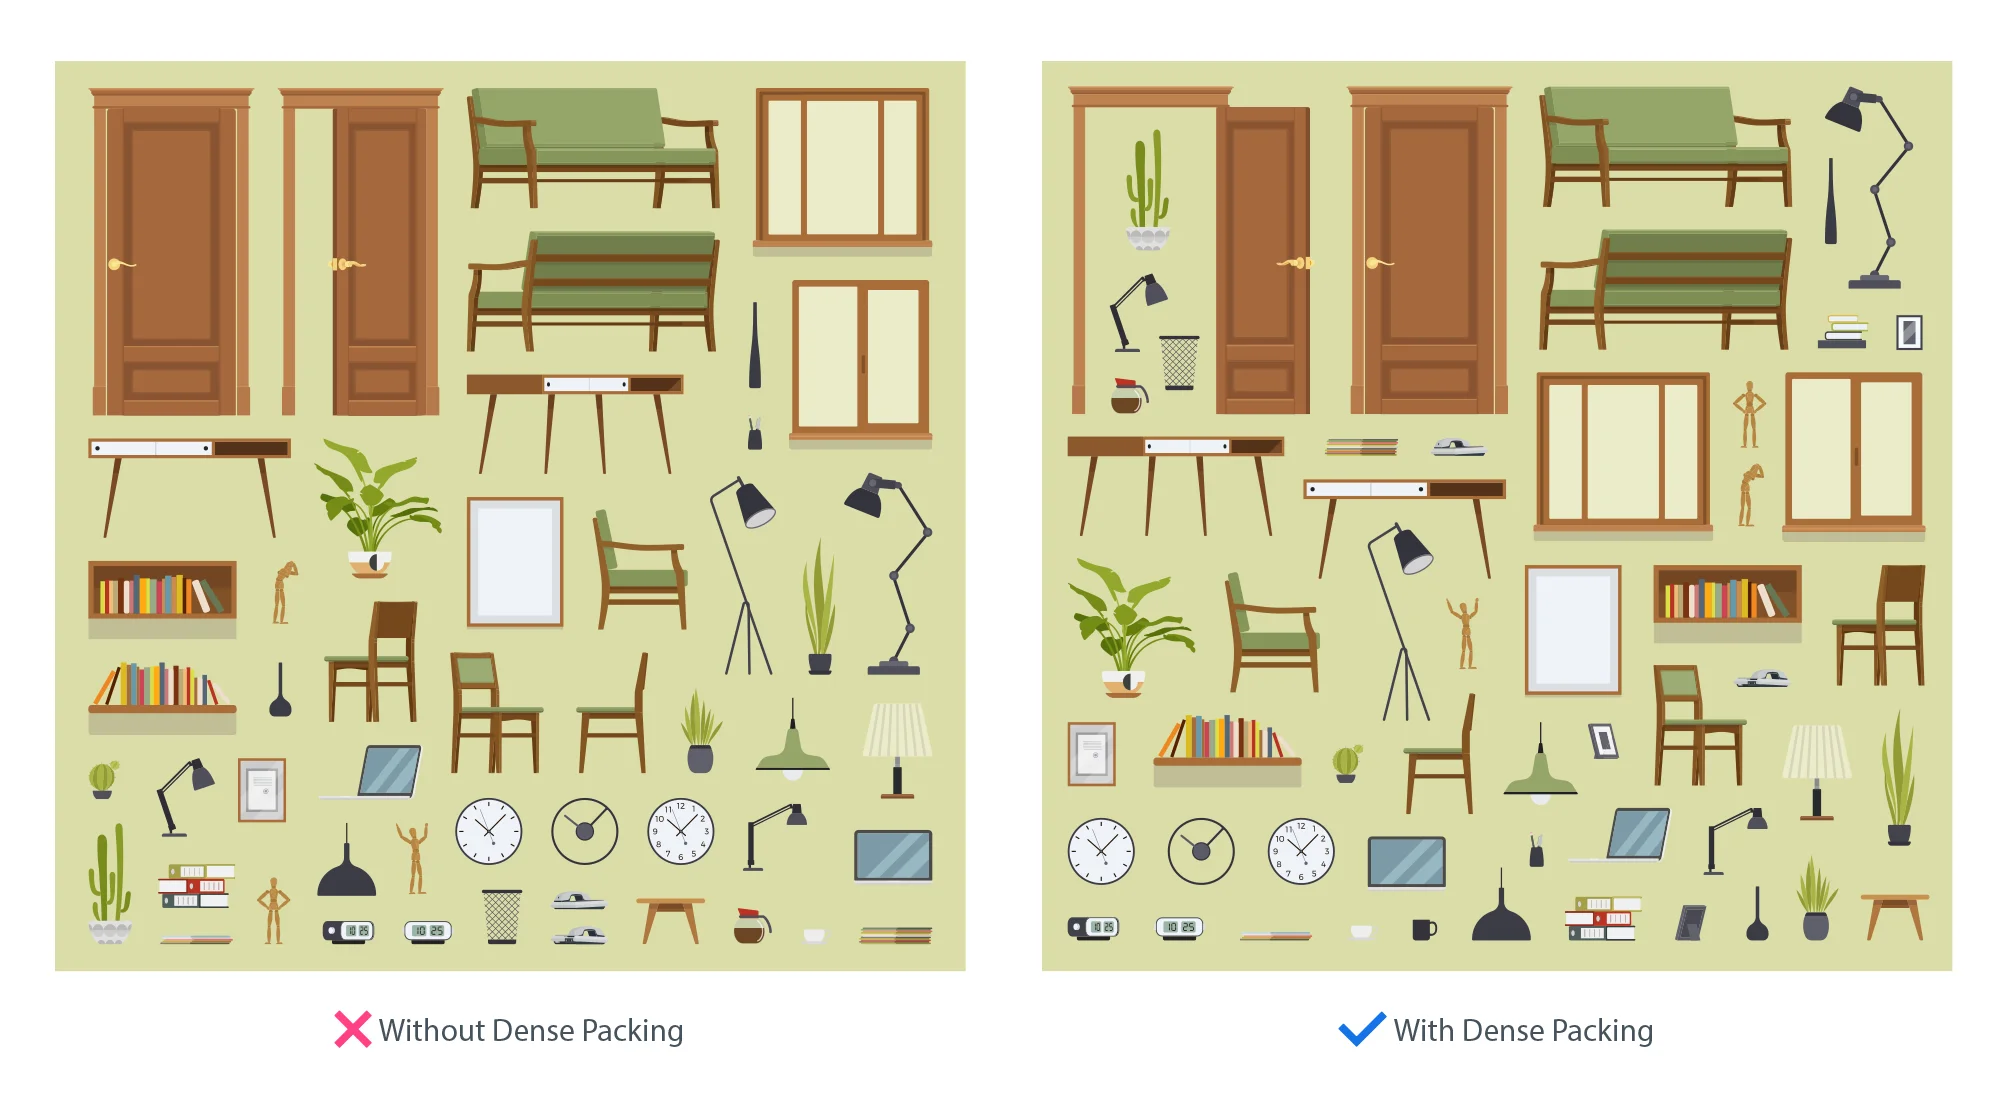
- Advanced "True-Shape" Algorithms: Unlike free scripts that only see rectangular bounding boxes, our Dense Packing and Shape Respect engines analyze the actual vector contours of your objects. This allows them to organically fill concave areas (like the space inside a letter 'O'), creating far more natural and dense layouts.
- A Non-Destructive Workflow: Our robust session-based system protects your original work. You can endlessly experiment with settings, randomize layouts, and cancel at any time, knowing your original objects are always safe. Most free scripts work destructively, permanently altering your art.
- Professional UI & Stability: A clean, intuitive panel gives you real-time control, while built-in safeguards prevent Illustrator from freezing on complex tasks. This provides a reliable and efficient workflow that scripts cannot match.
- Dedicated Support & Updates: This is a commercially supported product with ongoing development, not a "fire-and-forget" script. You get access to updates and dedicated user support.
Q: How does the plugin decide which object is the container?
A: Arrange Master keeps it simple: it automatically identifies the object with the largest visual area in your selection and treats it as the container. All other objects in the selection become the items to be arranged.
Q: How does Arrange Master handle raster images (photos)?
A: All layout modes can arrange raster images based on their rectangular bounding boxes. However, the advanced Dense Packing mode is an exception. Because it needs to analyze the precise vector geometry of each object, it is vector-only. If you enable Dense Packing with a selection that includes raster images, the plugin will show an error and cancel the operation to ensure predictable results.
Q: Does it support true-shape nesting or just bounding boxes?
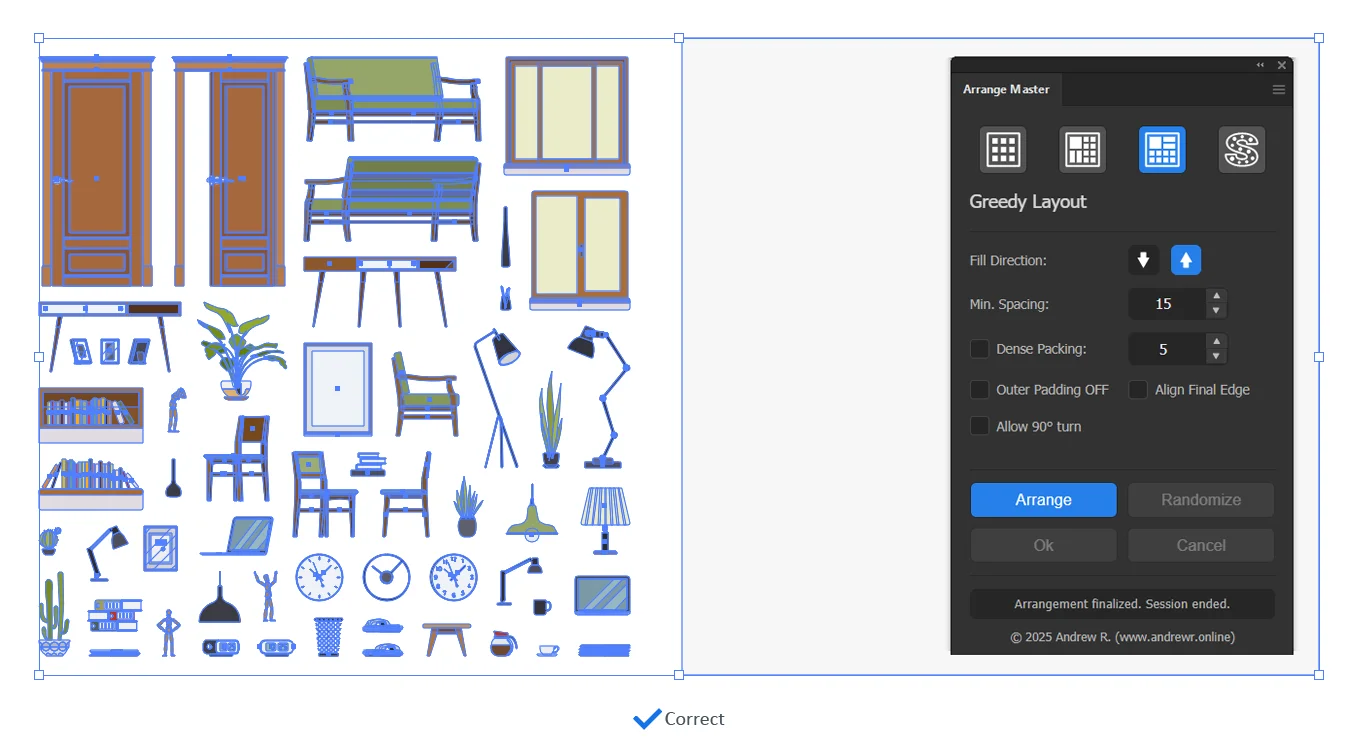
A: It does both! This is a core strength of Arrange Master. By default, the Grid, Knolling, and standard Greedy layouts operate on rectangular bounding boxes for maximum speed and predictability. However, when you enable the Dense Packing option in the Greedy panel, you activate a powerful "true-shape" nesting engine that analyzes the actual vector contours of your objects, allowing for far more organic and efficient packing.
Q: Can I use a group of objects as the container?
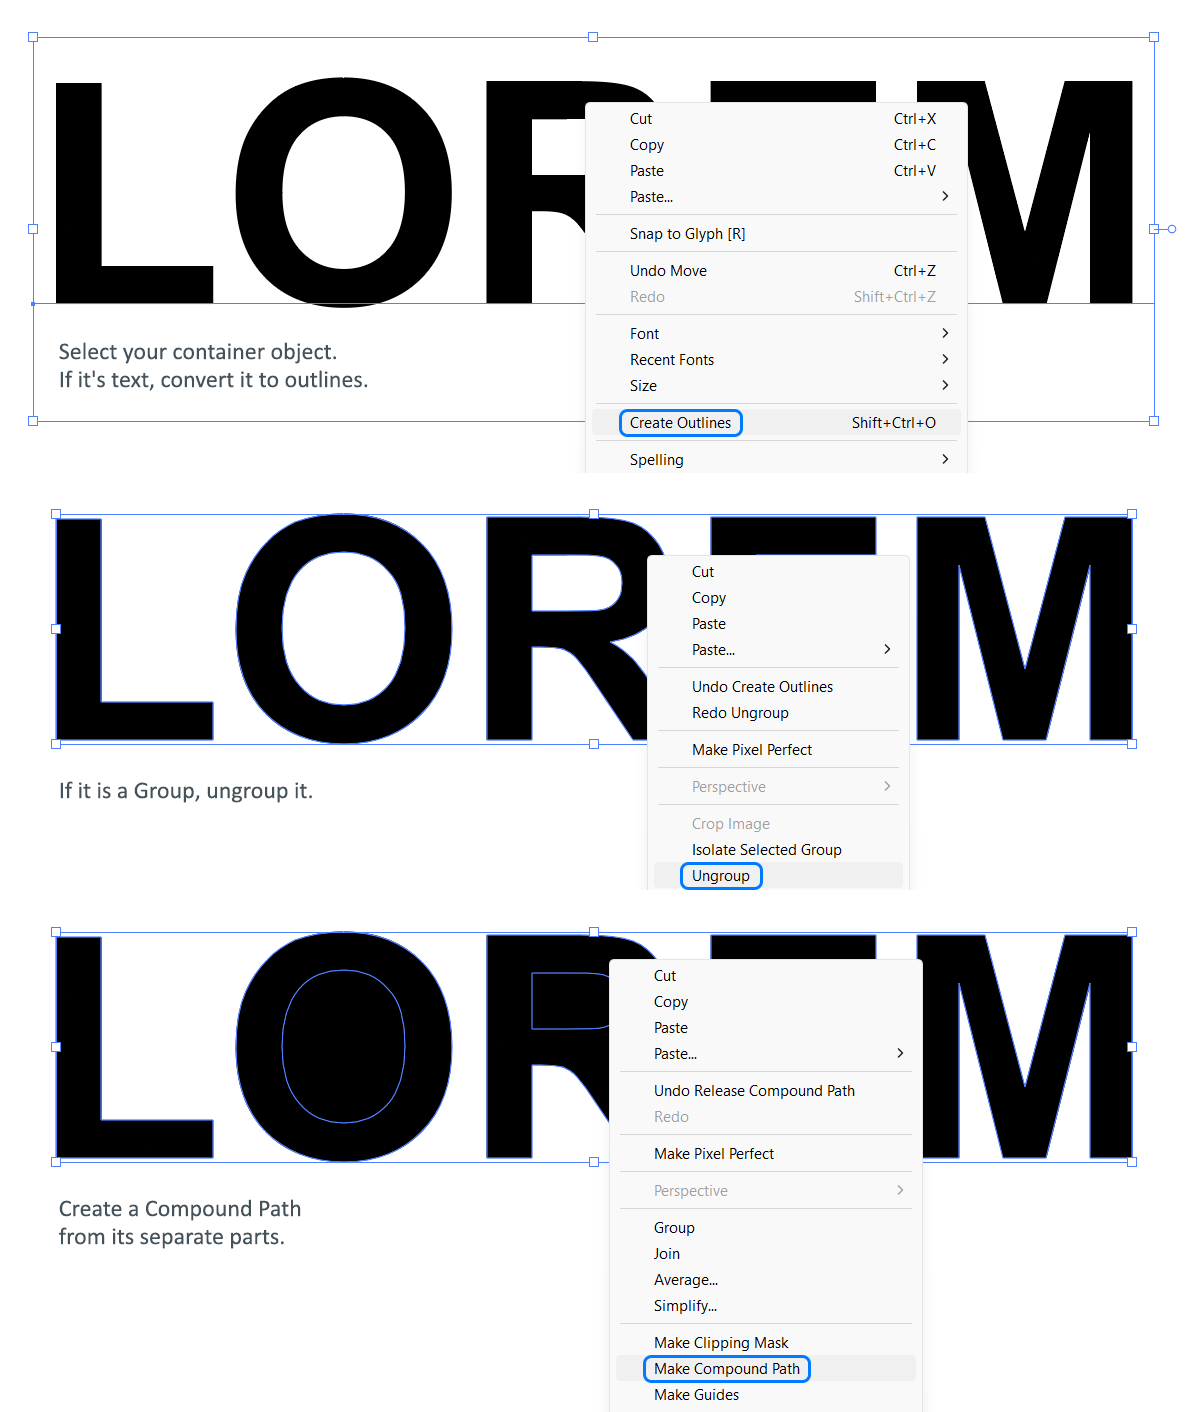
A: No. The container must be a single, continuous path object. This can be a simple shape (like a rectangle or ellipse) or a Compound Path. If your complex container shape is a Group, you must first convert it to a Compound Path.
How to fix: Select your grouped container shape and go to Object > Compound Path > Make (or press Cmd+8 / Ctrl+8).
Q: Does the plugin work with objects on different layers?
A: Yes. Arrange Master operates on your current selection, regardless of what layers the objects are on. When the arrangement is finalized, the objects will remain on their original layers but will be positioned inside the container. However, please ensure that none of these layers (or the currently active layer) are locked or hidden, as this may block the plugin from making necessary modifications.
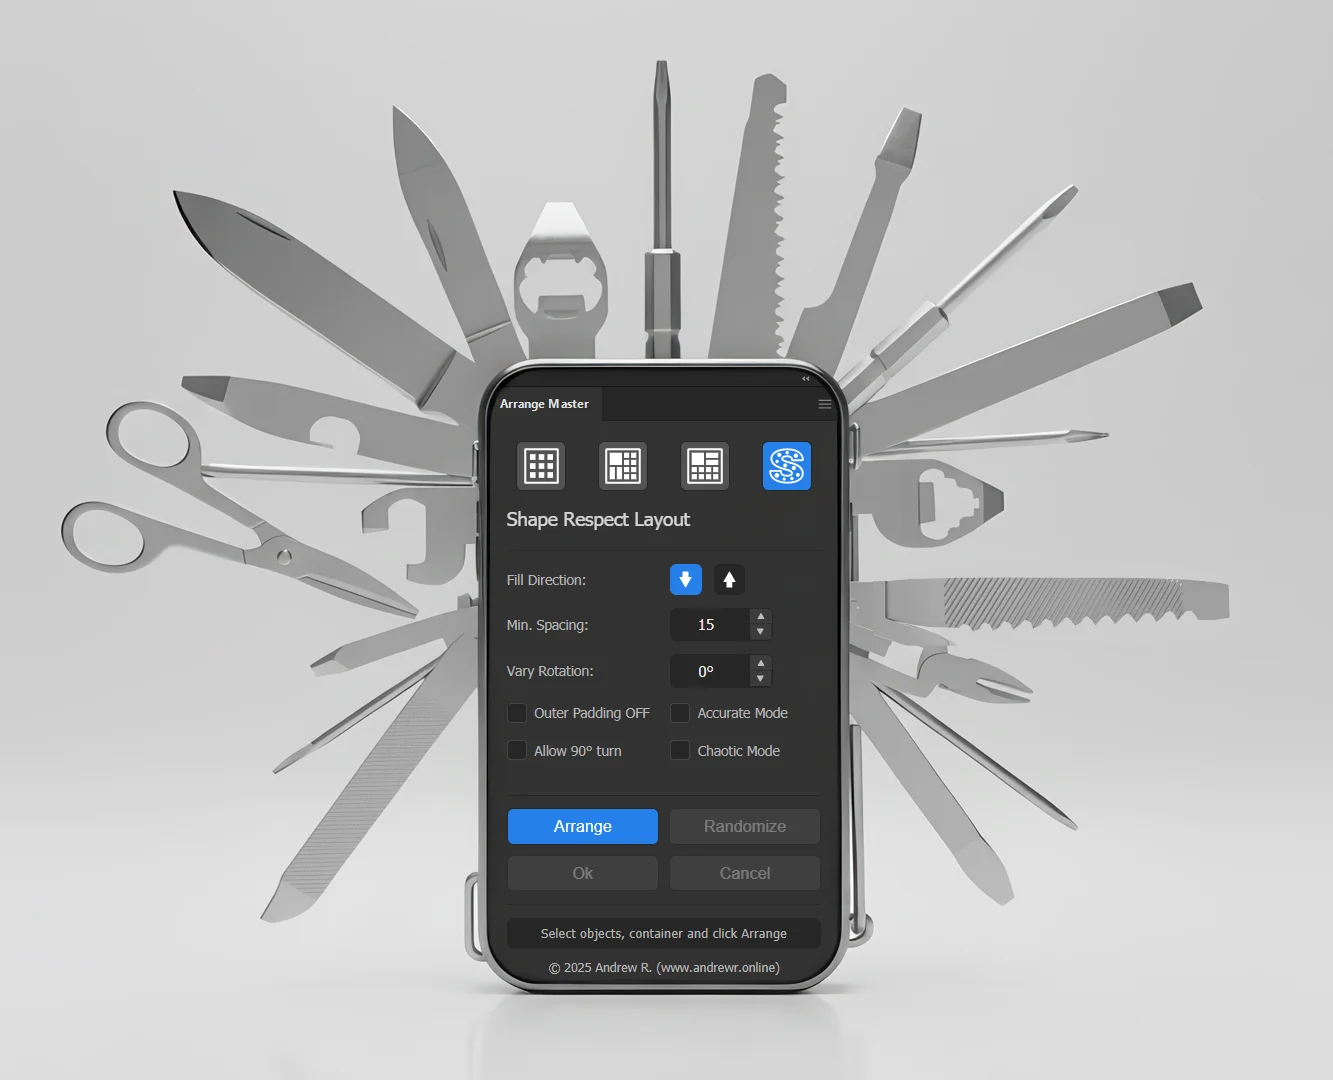
Q: Can the plugin rotate items to better fit inside a custom shape?
A: Yes. The Shape Respect layout has two rotation options. "Allow 90° turn" gives the algorithm permission to rotate items by 90 degrees if it finds a better fit. The new "Vary Rotation" setting adds organic randomness by rotating each item by a random angle *before* placement, which is perfect for creating natural-looking compositions.
3. Troubleshooting Layouts
Q: I clicked "Arrange" but nothing happens, or I get an error. Why?
A: This is almost always due to the selection. To use Arrange Master, you must select at least two objects: one object to serve as the container, and at least one item to be arranged inside it.
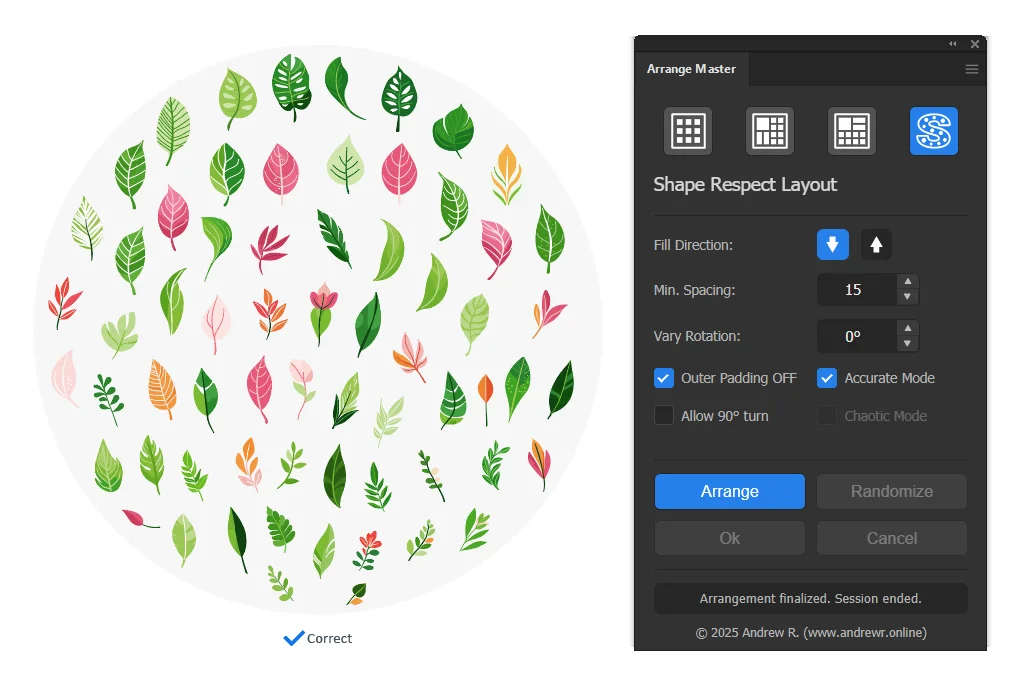
Q: Why are my items arranged in a rectangle even though my container is a circle?
A: You are likely using a layout method that does not respect the container's shape, such as Grid, Knolling, or Greedy. These algorithms operate on the container's rectangular bounding box.
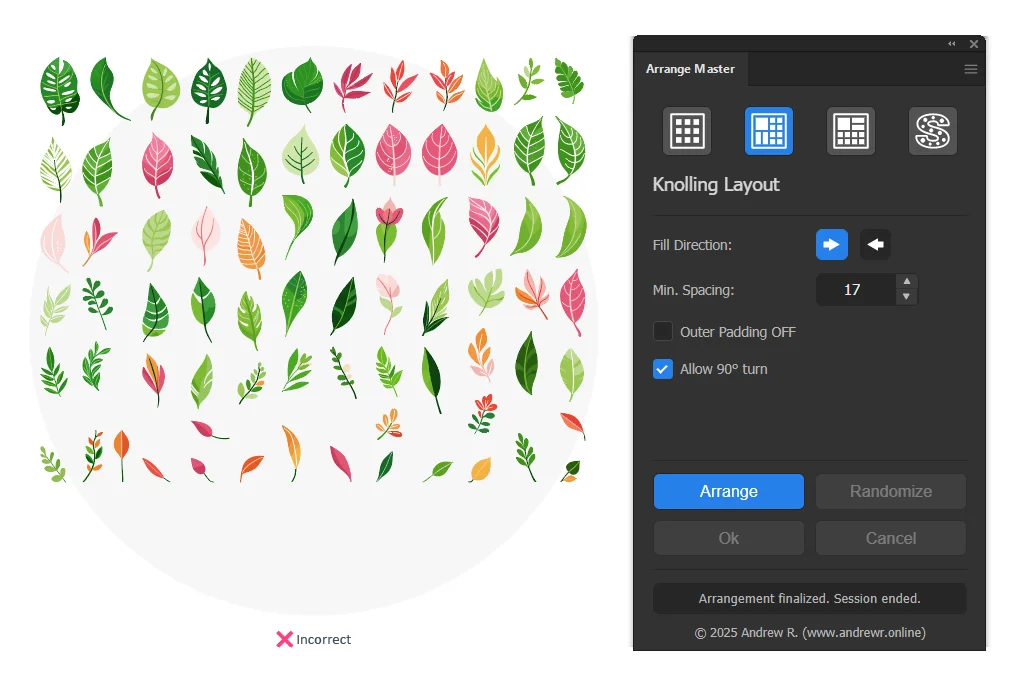
Solution: To arrange items inside a non-rectangular shape, you must use the Shape Respect Layout method. Click the fourth icon (letter "S" with dots scattered inside) in the panel.
Q: Why do my items only fill a small part of the container?
A: This usually means your "Min. Spacing" value is too small for the number of items you have. The algorithm places items, leaves the required spacing, and then runs out of items before it can fill the entire area.
Solution: Try increasing the "Min. Spacing" value in the panel and click Arrange again.
Q: Some of my items are placed outside the container. Why?
A: These are "overflow" items. The plugin places any item that cannot fit inside the container in a neat row above it, so you never lose your work. This can happen for two main reasons:
- There is physically not enough space left inside the container.
- In Grid Layout, the item (after rotation/scaling) is larger than the calculated size of a single grid cell.
Solution: To fit more items, either increase the size of your container object or decrease the "Min. Spacing" value.
Q: I get the error "Target layer cannot be modified." How do I fix it?
A: This is a standard Adobe Illustrator restriction. It occurs when the script tries to move or duplicate objects, but the layer they belong to (or the currently active layer) is restricted. To fix this:
- Make sure all layers and sublayers are visible (eye icon on) and unlocked (padlock icon off).
- Check that the Active Layer in your Layers panel is not locked or hidden.
- Ensure you are not working on a Template layer.
If the error persists, try unlocking all objects (Alt+Ctrl+2) and ensuring they are all on a standard, editable layer before clicking Arrange.
Q: In Shape Respect, my items aren't arranging inside the shape at all. What's wrong?
A: This almost always happens when your complex container shape is a Group instead of a Compound Path. The Shape Respect algorithm requires a single, unified path to analyze.
Solution: Select your container object. If it is a Group, ungroup it (Cmd+Shift+G / Ctrl+Shift+G) and then immediately create a Compound Path from its parts by going to Object > Compound Path > Make (Cmd+8 / Ctrl+8). Now, re-select all your items and the new Compound Path container, and run Arrange Master again.
Q: Why does Shape Respect (Accurate Mode) take so long to run?
A: Accurate Mode is an extremely powerful but computationally intensive algorithm. It creates a dense grid of thousands of potential placement points and checks each one for every item. This produces high-quality results but can be slow with many objects.
Solution: For large numbers of items (>100), it is recommended to use the default "Fast" mode or the "Chaotic Mode" for much better performance. Use "Accurate Mode" when you have fewer items and need the most precise, grid-like placement possible.
Q: I selected raster images and a container, but Arrange Master still says "Please select at least 2 objects." Why?
A: Sometimes when arranging raster objects (bitmaps) inside a container, Arrange Master may not correctly process the selection. This is often related to the stacking order of the objects.
Solution: Select the container, right-click on it, and choose Arrange > Send to Back from the context menu. Then, try the arrangement again. Arrange Master should now correctly process the selection and place the objects according to your settings.
Q: I clicked "Cancel", but my original objects are gone! How do I get them back?
A: Don't worry, your objects are safe! The "Cancel" function works by deleting the temporary arranged copies and then making your original, hidden items visible again. If you immediately perform another action or if Illustrator is under heavy load, there might be a slight delay in the screen redraw.
Solution: Simply press Cmd+Z / Ctrl+Z (Undo) once. This will refresh the document state and your original objects will reappear.
Q: Why can't Arrange Master create a beautiful composition with just a few objects?
A: Arrange Master is a powerful packing tool, but it is not a composition artist. For its algorithms to create a dense and harmonious layout, they need a sufficient number of items to work with. Trying to arrange just 5 or 10 large, awkwardly shaped objects will often result in a sparse and unbalanced composition.
- The "Main Dish and Garnish" Analogy: Think of your large, important items as the "main dish" of your composition. To arrange them beautifully, you need a "garnish" — a variety of smaller, simpler items (circles, squares, simple icons) that the algorithm can use to fill the empty spaces and smooth out the edges of the layout.
- Solution: If your composition looks empty, try adding a set of smaller, decorative "filler" items to your selection. This will give the algorithm the material it needs to create a much tighter and more visually appealing result.
